How do Laplacian pyramids work in OpenCV
This recipe explains how do Laplacian pyramids work in OpenCV
Recipe Objective: How do laplacian pyramids work in OpenCV?
In this recipe, we are going to understand what is Laplacian Pyramids
Table of Contents
Step 1: Import the libraries and read the image
Let us first import the necessary libraries and read the image. The image that we are using here is the one shown below. Let us read the image in grayscale this time for better results.

import numpy as np

import cv2

image = cv2.imread('edgeflower.jpg',0)
Step 2: Create a Gaussian Pyramid
There is no pre-defined function for creating a Laplacian pyramid in OpenCV. Laplacian pyramids can be obtained by the difference between that layer and its lower layer (i.e., expanded layer) in the Gaussian pyramid. We already know that Laplacian is a high pass filter, and for this reason, we obtain the edges of the image as output in each layer.
Let us now create a gaussian pyramid, and in the next step, we shall calculate the difference between layers to obtain the Laplacian pyramid.
To begin with, let us create an array called gaussian in which we will store all the layers of the Gaussian pyramid and initialize a variable called gaussian_layer with a copy of the image that we have read using the copy() function.
gaussian = []

gaussian_layer= image.copy()
We can easily create a Gaussian pyramid using the cv2.pyrDown() function inside a loop.
for i in range(3):
    gaussian_layer = cv2.pyrDown(gaussian_layer)
    gaussian.append(gaussian_layer)
    cv2.imshow('Gaussian Layer -{}'.format(i),gaussian_layer)
cv2.waitKey(0)
cv2.destroyAllWindows()
In the above chunk of code, we perform two other functions inside the loop for every iteration. One is appending the gaussian layer that we obtained from the cv2.pyrdown() function to the list that we created earlier using the append() function. The other displays each layer of the Gaussian pyramid using the cv2.imshow() function.
Output:

Step 3: Create a Laplacian Pyramid
Once we have the list of gaussian layers ready, we can proceed with creating the Laplacian pyramid. To do that, let us first initialize a list called Laplacian which will store all the layers of the Laplacian pyramid with the top image of the Gaussian pyramid. (i.e., the last element of the gaussian list).
laplacian = [gaussian[-1]]
Then by iterating through the gaussian list in reverse order, let us perform the following in each iteration.
- Obtain the expanded layer of the current layer using the cv2.pyrup() function
- Obtain the Laplacian layer by calculating the difference between the current gaussian layer and the expanded gaussian layer using the cv2.subtract() function.
- Append each Laplacian layer to the laplacian list.
- Display each Laplacian layer.
for i in range(2,0,-1):
size = (gaussian[i - 1].shape[1], gaussian[i - 1].shape[0])
gaussian_expanded = cv2.pyrUp(gaussian[i], dstsize=size)
laplacian_layer = cv2.subtract(gaussian[i-1], gaussian_expanded)
laplacian.append(laplacian_layer)
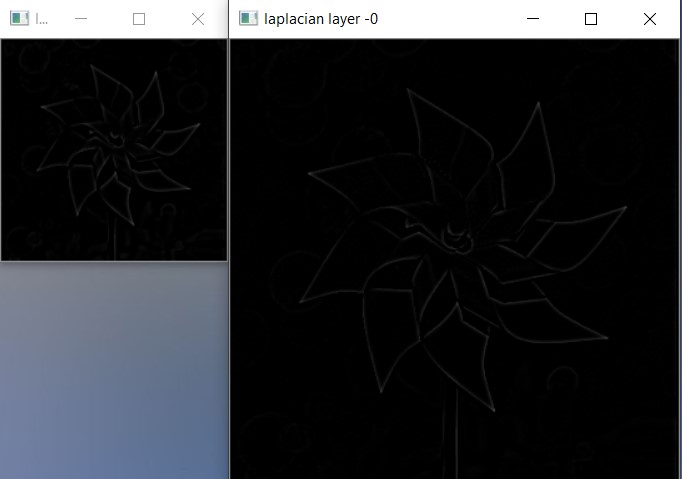
cv2.imshow('laplacian layer -{}'.format(i-1),laplacian_layer)
cv2.waitKey(0)
cv2.destroyAllWindows()
As is well known that the dimensions of the two images that we subtract must be of the same dimension, we calculate the size of the layer behind the current layer and pass that size as the output size to the dstsize parameter of the cv2.pyrUp() function. The dstsize parameter is an optional parameter of both cv2.pyrUp() and cv2.pyrDown() functions which returns the output image in the desired dimension.
Output:

Download Materials

What Users are saying..

Abhinav Agarwal
I come from Northwestern University, which is ranked 9th in the US. Although the high-quality academics at school taught me all the basics I needed, obtaining practical experience was a challenge.... Read More