How to Use Apache Sqoop Incremental Imports?
This recipe will help you revolutionize your data transfer with Apache Sqoop incremental imports. Check this step by step guide by ProjectPro!
Recipe Objective - How to Use Apache Sqoop Incremental Imports?
Apache Sqoop is a powerful tool designed to efficiently transfer data between Hadoop and relational databases. One of its key features is incremental imports, which allow you to extract only the data that has changed since the last import. This can significantly reduce the time and resources needed for data transfers, especially when dealing with large datasets. Check out this recipe to explore how to use Apache Sqoop for incremental imports.
Prerequisites to Set Up Incremental Import in Sqoop
Before proceeding with the recipe, make sure the following installations are done on your local EC2 instance.
-
Single node Hadoop - click here
-
Apache Sqoop -click here
-
MySQL - click here
Sqoop Incremental Import - Setting up the Environment
-
In the AWS, create an EC2 instance and log in to Cloudera Manager with your public IP mentioned in the EC2 instance.
-
To do this, type “your public IP:7180” in the web browser and log in to Cloudera Manager, where you can check if Hadoop and Sqoop are installed.
-
If they are not visible in the Cloudera cluster, you may add them by clicking on the “Add Services” in the cluster to add the required services in your local instance.
How to Use Sqoop Incremental Load - A Step-by-Step Guide
Using Sqoop for incremental loads is a crucial aspect of efficiently transferring data between Hadoop and relational databases. Check out the following step-by-step guide to walk through the process of performing incremental data transfers with Sqoop, helping you manage and synchronize your data effectively.
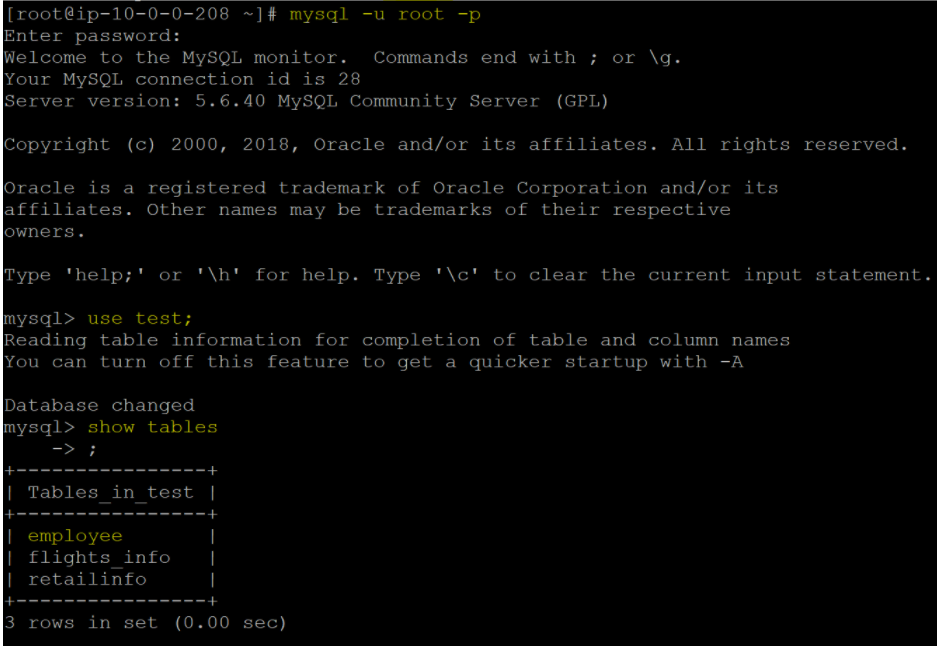
Step 1: Connect to MySQL
To initiate an incremental import using Sqoop, the first step is to log in to your MySQL database. You can achieve this by running the following command and providing the required credentials:
mysql -u root -p;
Once logged in, select the database where your target table is located using the "use" command and list the tables to confirm the presence of the table you intend to import. In this example, we'll be using the "employee" table from the "test" database.
use <database name>
Show tables;
Enter the required credentials. And check tables in the database “test.” We used an “employee” table from the “test” database to demonstrate this recipe.
Retail Analytics Project Example using Sqoop, HDFS, and Hive
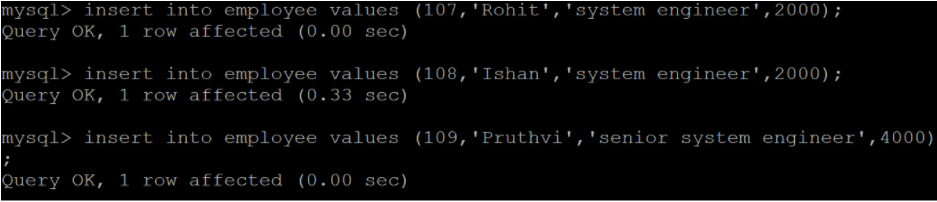
Step 2: Prepare the Table
Before performing an incremental import, it's essential to have a column in your table that can serve as a primary key or a column on which you can apply the incremental append condition. To demonstrate incremental import, add a few records to the "employee" table, ensuring that the primary key or the incremental column is incremented.
So, before proceeding, let us first append a few records in the “employee” table along with the incremented values of the corresponding primary key column.
Step 3: Verify the Target Directory
Before running the "sqoop import" command, it's crucial to ensure that the target directory in HDFS does not already exist. If it does, the import command will throw an error. You can check this by attempting to delete the directory you plan to use as the target directory:
hadoop fs -rm -r < target directory >

Step 4: Execute the Sqoop Import
Now, run the sqoop import command to fetch only those greater than the last recorded or last seen value.
sqoop import \
--connect jdbc:mysql://localhost/<database name> \
--table <table name> \
--username <user name> --password <password> \
--target-dir <target directory in HDFS> \
--incremental append --check-column <required column in the table> \
--last-value <last seen or written value> \
-m <no. of mapper jobs>

After running the Sqoop import command, you'll see the incremental import process in action, with updated data being fetched and saved to the specified target directory in HDFS. The output will indicate the progress of the import operation.
Output:
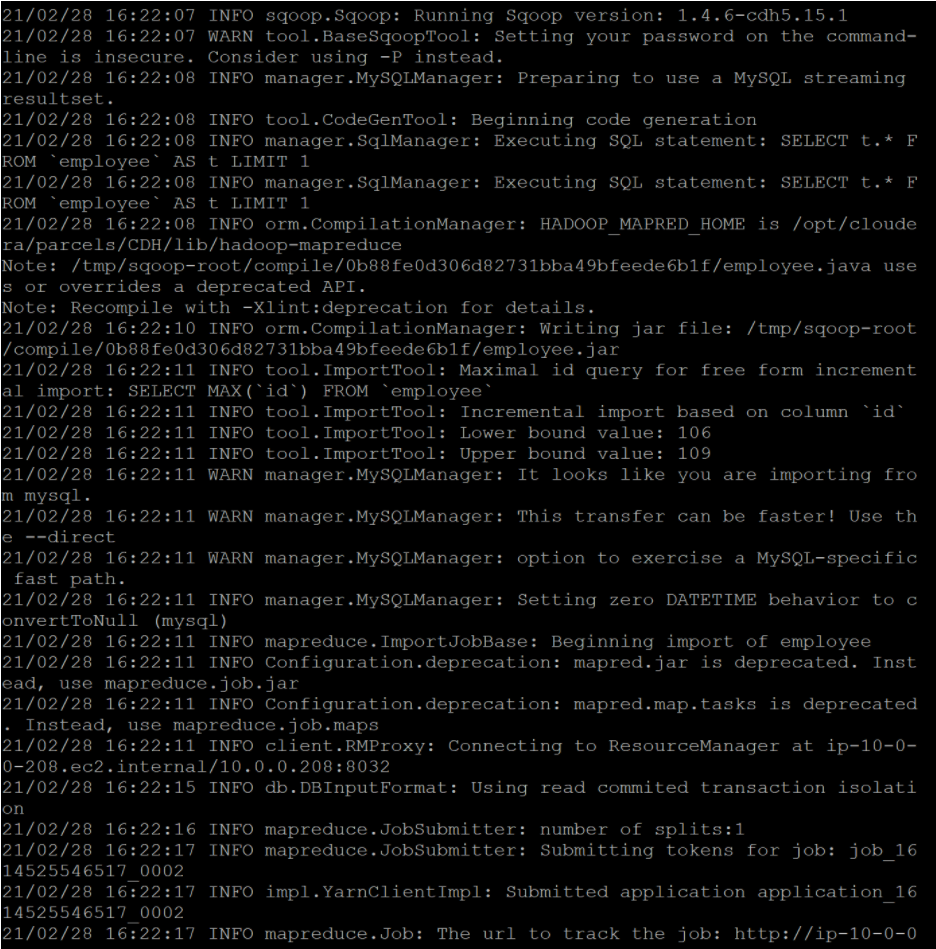

This structured approach helps you perform incremental imports with Sqoop in a systematic manner, ensuring that you only import the most recent data from your MySQL database into HDFS.
Tips for Efficient Incremental Imports in Sqoop
-
Optimize your database table for performance. Indexes and appropriate data types can significantly speed up the process.
-
Choose an appropriate incremental column. Timestamps are often a good choice, as they represent a chronological order of records.
-
Monitor and maintain your imports. Keep an eye on the growth of data in your Hadoop cluster and adjust your incremental import strategies as needed.
Learn more about Sqoop Incremental Import with ProjectPro!
Mastering Apache Sqoop's incremental imports is a valuable skill for any data professional, as it enables efficient data transfer between Hadoop and relational databases. However, the true mastery of this and other data tools comes through practical experience in real-world projects. ProjectPro offers an exceptional platform to gain hands-on experience, boasting a diverse repository of projects focused on data science and big data. By engaging with these projects, you can hone your skills, enhance your expertise, and make yourself a more competitive and capable data practitioner. So, don't hesitate to explore more about Sqoop Import Operations with ProjectPro to start your journey of practical learning and skill development.

What Users are saying..

Ameeruddin Mohammed
I come from a background in Marketing and Analytics and when I developed an interest in Machine Learning algorithms, I did multiple in-class courses from reputed institutions though I got good... Read More